


Drawing can be a fun and rewarding activity, especially when you’re learning to create something as cute as a cat. In this post, we’ll explore the unique method of “Drawing:a4z_-ymtkr8= cat” that breaks down cat drawing into simple, easy-to-follow steps. Whether you’re a complete beginner or someone looking to improve your drawing skills, this guide will help you master the art of drawing cats.
What is the Drawing:a4z_-ymtkr8= Cat Method?
Drawing: a4z_-ymtkr8= is a beginner-friendly method that simplifies the complex art of drawing. By breaking down the subject—like a cat—into basic shapes and lines, it makes the process much easier to follow. In this guide, we’ll cover everything from drawing the body to adding details like fur and whiskers, helping you create your own cat masterpiece.
Getting Started with the Drawing:a4z_-ymtkr8= Cat Method
Before diving into the process, it’s essential to gather the necessary supplies. Drawing tools like pencils, erasers, and paper are the basic essentials you’ll need. While a standard A4 sheet works perfectly, you can also use other sizes based on your preference.
The Drawing:a4z_-ymtkr8= cat method encourages a step-by-step approach, which is ideal for beginners. By focusing on drawing basic shapes first, you avoid the complexity of starting with intricate details.
Supplies You Need for Drawing:a4z_-ymtkr8= Cat
To start your drawing journey, you only need a few items:
- Pencils (preferably HB for sketching, and a darker 4B or 6B for shading)
- Eraser for any corrections
- Sharpener to keep your pencils ready
- A4 Paper (or any other size you’re comfortable with)
- Ruler for straight lines if needed
Once you have all these items, you are ready to begin your Drawing:a4z_-ymtkr8= cat journey.
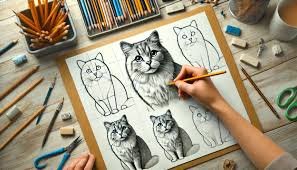
Step 1 – Drawing Basic Shapes
Now that you’re ready, let’s begin drawing by breaking the cat down into simple shapes. The Drawing: a4z_-ymtkr8= method simplifies the process by starting with circles and ovals for the head and body.
Drawing the Head and Body
The first step in the Drawing: a4z_-ymtkr8= method is to create a circle for the cat’s head. This doesn’t have to be perfect, as it will only act as a guideline. Below the head, draw an oval shape for the cat’s body. The oval should be slightly larger than the head circle.
By starting with these basic shapes, you create a framework to build upon, making the overall process much simpler.
Adding the Ears and Tail
Next, draw two triangles on top of the head circle for the cat’s ears. Keep them proportional to the head, and don’t worry if they aren’t perfect—this can be refined later.
For the tail, add a long, curved line extending from the body. Cats have flexible tails, so feel free to make it bendy. This step helps in bringing the cat’s form to life, following the principles of the Drawing:a4z_-ymtkr8= cat method.
Step 2 – Detailing the Face
Once you have the basic outline, it’s time to add details to the face. The Drawing: a4z_-ymtkr8= method makes it easier by focusing on symmetry and placement.
Drawing the Eyes, Nose, and Mouth
Start by placing two circles for the eyes. These should be at the upper part of the head circle. Below the eyes, draw a small triangle for the nose. From the bottom point of the nose, draw a small, straight line downward, followed by a soft “W” shape for the mouth.
These simple steps, common in the Drawing: a4z_-ymtkr8= method, will guide you in giving your cat a cute and expressive face.
Adding Whiskers and Fur Texture
For the whiskers, draw three curved lines extending from each side of the face. You can keep these lines light and simple. To add some texture to the fur, gently sketch short, curved lines along the outline of the face and body. This creates the illusion of soft fur, a critical element in making your Drawing:a4z_-ymtkr8= cat look realistic.
Step 3 – Shading and Final Touches
Now that you have the basic structure and details, it’s time to bring depth to your cat drawing by adding shading.
Shading the Body and Face
Using a softer pencil like 4B or 6B, begin shading the areas where shadows naturally fall. For instance, the lower part of the cat’s body and under the chin can have darker shading. This step adds a three-dimensional look to your Drawing:a4z_-ymtkr8= cat.
Remember to blend the shading smoothly, especially around the face and body, to create a softer look.
Refining the Final Details
Once shading is complete, go over the outline of the cat to make it more defined. You can also add more details, such as small lines in the eyes to give them a sparkle or finer strokes on the tail to enhance the fur texture. These finishing touches will complete your Drawing:a4z_-ymtkr8= cat and make it truly stand out.
Common Mistakes to Avoid in Drawing:a4z_-ymtkr8= Cat
Even with a clear method like Drawing: a4z_-ymtkr8=, mistakes can happen. Here are some common errors beginners face and how to avoid them.
Overcomplicating the Process
One of the most common mistakes is trying to rush into the details too quickly. The Drawing: a4z_-ymtkr8= method teaches us to start with basic shapes. Skipping this step can lead to frustration as proportions may get off.
Ignoring Proportions
Another common issue is getting the proportions wrong. Remember, the cat’s head should be smaller than its body, and the eyes should sit symmetrically. Keeping these proportions in mind will help you create a balanced and visually appealing drawing.
Practicing the Drawing:a4z_-ymtkr8= Cat Method
The key to getting better at drawing cats using the Drawing: a4z_-ymtkr8= method is practice. The more you repeat the steps, the more natural they will feel, and the more confident you’ll become.
Daily Practice Routines
Set aside 10 to 15 minutes each day to practice drawing cats. Start with simple outlines, and gradually add more details as you feel comfortable. Over time, you will notice a significant improvement in your skills.
Exploring Different Poses
Once you’ve mastered the basic cat pose, try drawing cats in different positions. Whether it’s a sitting cat or a playful one, using the Drawing: a4z_-ymtkr8= method will help you create new poses with ease.
Conclusion: Mastering Cat Drawing with Drawing: a4z_-ymtkr8= Method
Drawing cats can be a rewarding experience, and the Drawing:a4z_-ymtkr8= Cat method makes it accessible for beginners. By focusing on simple shapes, gradual details, and consistent practice, you can create beautiful, realistic cat drawings.
If you follow these steps, you’ll soon be able to draw not only cats but other animals using the same principles. So, grab your drawing tools and start your artistic journey today!
Read More: Animated:xqhhhbn4nc8= Happy Birthday Gif – The Perfect Birthday Greeting
